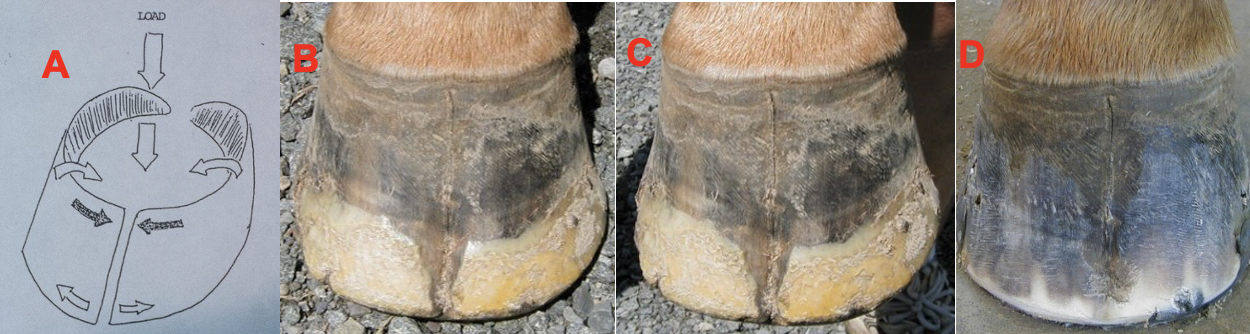
| Toe Cracks Made Simple Stephen E. O’Grady, DVM The management of full thickness toe cracks is often challenging for both veterinarians and farriers. A full thickness toe crack originates at the dorsal coronet and extends distally. Interestingly, if the defect is full thickness, movement of the crack at the coronet will generally be observed. The defect will open when the foot is unloaded and then close when the foot is weight bearing (Figure 1). As with other hoof wall defects, a toe crack will be associated with a hoof capsule distortion, either a clubfoot or a long toe low heel foot conformation. The clubfoot conformation concentrates the load in the dorsal hoof wall while the long toe low heel creates leverage that puts excessive stress on the dorsal hoof wall. The excessive repetitive overload on the dorsal hoof wall causes the horn tubules to bend, a concavity or ‘dish’ in the wall will become evident and finally a defect forms at the coronet if the stress continues. Often, the emphasis in farriery is placed on repairing/stabilizing the defect rather than eliminating the cause.
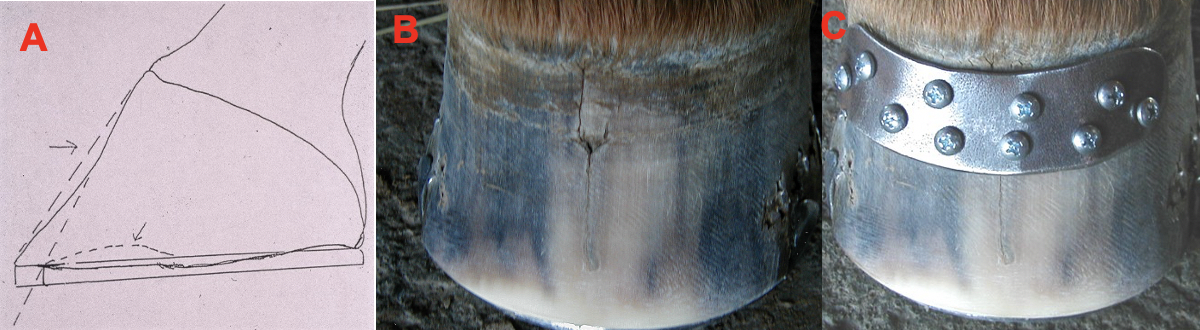
Farriery The pertinent farriery principle with either type of foot conformation is to redistribute the load away from the affected area in the dorsal toe to the palmar section of the foot. To begin, a line is drawn across the widest part of the foot with a marker and then the foot is trimmed from this line palmarly until the frog and the hoof wall at the heels are on the same plane. No trimming of the sole is performed dorsal to the line as the sole will generally be thin. Interestingly, the concavity in the dorsal hoof wall will correlate to the amount the sole drops, flattens, and decreases in thickness (Figure 2A).The length of the toe is reduced from the outer dorsal hoof wall using the direction of the coronet relative to the ground as a guideline. In most cases, the dorsal hoof wall will become solid from the middle of the foot to the border of the wall at the ground. The hoof wall is trimmed distally until the white, inner part of the stratum medium is observed around the perimeter of the foot from toe quarter to toe quarter (Figure 2B). The fact that the wall becomes solid distally makes the use of a shoe with side clips to stabilize the crack of no value.A shoe is fitted such that the line drawn across the widest part of the foot is in the middle of the shoe and the toe of the shoe should be set 0.5-1cm palmar to the margin of the toe. Breakover is created in the shoe in a tapered fashion beginning at the first nail hole. In the case of the clubfoot, some heel elevation may need to be added to accommodate any shortening in the DDF musculotendinous unit because of the trim. A stabilizer or spider plate can be added to the long toe low heels foot to redistribute the weight across the solar surface if the heels are compromised. In many instances, when the farriery is completed, the defect at the coronet will not show any movement. If no movement is noted, the defect is not treated.
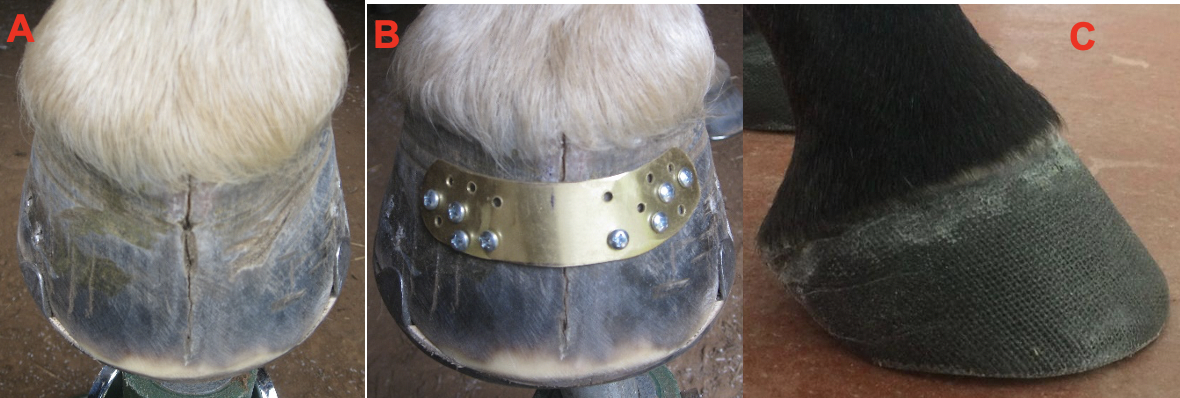
Stabilizing the crack I have seen many elaborate methods described to repair these cracks, but I have always tried to keep things simple. Over the years, I have generally used a metal band with screws, however, lately I have been using casting tape in a method described by Derek Poupard, CJF. Under no circumstances is the crack opened and debrided unless it is infected, which is rare. Any discomfort associated with the toe crack is generally due to structural instability. To apply a band, aluminum foil is used to make a template that mimics the contour of the coronet. Using the template as a guide, a band is cut from a brass plate (available at Home Depot); drill holes in the plate and then shape it to the contour of the dorsal hoof wall distal to the coronet (Figure 2C). To cast the dorsal hoof wall, Keratex® hoof putty is placed in the defect or a suitable drain is used if the defect is wide or has been opened. The hoof wall is lightly sanded, and a thin layer of an acrylic adhesive is applied to the entire hoof wall. The foot is cast using 2- or 3-inch Hoofcast®. When the cast is cured, the section of cast across the heels is removed. This technique is fast, simple and gives excellent stability. Please see here for a description of this casting technique. Here is the key to success no matter which method is used: the band or the cast should be applied in the non-weight bearing position (foot placed on a hoof stand). This ensures that the crack is stabilized in the open position (Figure 3). If the band or cast is applied in the weight bearing position, the horn papilla at the coronet will be compressed, the defect will heal slower and there will be a substantial scar composed of compromised wall.
Be safe. |