The proper application of the wooden shoe: An overviewReprinted with permission from Equine Veterinary Education (EVE). |
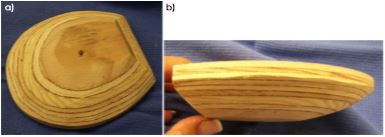 |
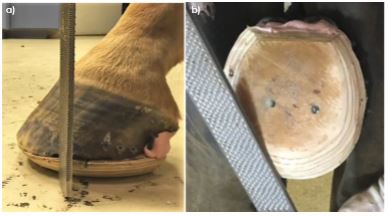
| Fig 1: a) Ground surface and b) side view of the wooden shoe. Note the bevel around the perimeter of the shoe and the flat platform on the ground surface. |
Among those problems that may benefit from the wooden shoe are acute/chronic laminitis, extensive white line disease, fractures of the distal phalanx/navicular bone and horses that have feet with thin deformable soles. The wooden shoe should only be used as a transitional device to stabilise the hoof capsule, promote hoof wall growth at the coronet and increase sole depth. Once the structures of the hoof capsule have improved with sufficient mass to achieve stability and realignment of the distal phalanx within the hoof capsule in the case of chronic laminitis, conventional farriery is used or the horse can be left barefoot. The wooden shoe is simple to apply but, as with any procedure, there is a learning curve such that it is essential to follow a procedural model. Understanding the biomechanics of the wooden shoe coupled with understanding good basic farriery which include the appropriate foot trim, proper size, fit and placement of the wooden shoe on the foot along with its proper application are essential. It must be stated from the onset, that the application of the wooden shoe must be combined with the appropriate foot trim for the clinician to achieve consistent effective results from this modality. Chronic laminitis is the disease most often treated with the wooden shoe, so its use here will be stressed when describing the overall procedure.
Advantages
The wooden shoe has all the mechanical aspects that can be incorporated in other farriery systems previously described yet it may possess some additional advantages over previous methods. A major advantage of the wooden shoe, coupled with the trim, is its ability to redistribute the load (weight) evenly over a specified section of the foot due to its flat solid construction (O’Grady and Steward 2009; Parks and O’Grady 2009; O’Grady 2010, 2011). Silastic material added to the solar surface of the foot further increases the surface area of the foot enhancing the effects of placing one flat surface against another (Parks and O’Grady 2015). Another advantage is its nontraumatic application that eliminates the necessity to use local anaesthesia in the case of chronic laminitis or other painful foot problems (O’Grady and Steward 2009; Parks and O’Grady 2015). The wooden shoe is constructed from readily accessible materials (wood) or can be purchased commercially.1 Breakover and heel elevation can be fabricated into the shoe and the beveled perimeter of the shoe decreases the torque on the lamellae at breakover by moving the ground reaction force axially. The beveled perimeter of the shoe also appears to concentrate the load (weight) under the distal phalanx due to the solid base of the shoe. Heel elevation, when necessary, can be applied in a uniform manner by altering the shape of the wooden shoe or by attaching a degree pad to the foot surface of the shoe. The shoe can be easily adjusted using radiographic guidelines and the biomechanical or structural requirements of the individual foot conformation.
Mechanism
The wooden shoe addresses three of the principles used in applying therapeutic farriery. The first is to redistribute the load (weight of the horse) or unload the forces on a section of the ground surface of the foot. Secondly, to reposition breakover and lastly, to provide heel elevation when necessary to decrease the tension in the deep digital flexor tendon (DDFT) (O’Grady 2006, 2011; Parks 2011, 2012; Parks and O’Grady 2015). These three principles are especially relevant when treating chronic laminitis. To understand these principles, it is necessary to briefly consider foot biomechanics and the moments about the distal interphalangeal joint (Eliashar 2007; Parks 2011, 2012; Parks and O’Grady 2015). In a standing horse, the weight of the horse borne by the limb exerts a force on the ground which is opposed by an equal and opposite force, the ground reaction force (GRF). The GRF acts on any point of the foot touching the ground. The summation of these forces can be calculated to have a central point of action which is termed the centre of pressure(COP). The position of the centre of pressure varies depending on foot conformation and trimming but will be located dorsal to the centre of rotation (COR) of the distal interphalangeal joint (DIPJ). The GRF being dorsal to the COR creates a moment about the distal interphalangeal joint termed the extensor moment. The extensor moment must be opposed by an equal and opposite moment, which is termed the flexor moment. A moment is the product of a force and its distance from a reference point to cause a body to rotate about an axis which in this case, is the centre of rotation of the distal interphalangeal joint. At rest, the extensor moment is the product of the weight borne by the limb (a force) and the horizontal distance from the point at which the ground reaction force acts on the foot (COP) and the centre of rotation of the distal interphalangeal joint. The flexor moment opposes the extensor moment and is the product of the force (tension) in the tendon and the shortest distance of the DDFT from the centre of rotation (Fig 2a).
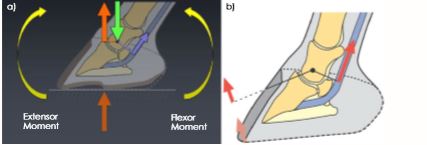 |
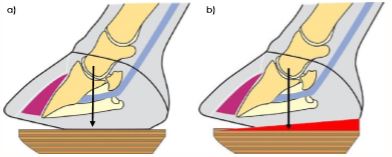
| Fig 2: a) The biomechanical forces exerted on the foot and the moments about the DIPJ. b) The GRF moving dorsally in the toe during mid-stance and breakover (Image courtesy of Andrew Parks). |
The GRF determines the subsequent compressive and tensile stresses that are placed on the dorsal section of the foot. If a horse is standing on its limb, the weight of the horse acts on the foot through the COR and is relatively constant, but the position of the GRF where it acts on the ground surface of the foot can be shifted away from the affected area or redistributed. At breakover, the flexor moment begins to exceed the extensor moment such that the GRF moves dorsally to the toe at which point the heels lift off the ground (Fig 2b). As the COP moves dorsally, it places greater force at the toe; a force that can potentially be disruptive. The thickness of the wooden shoe allows breakover to be placed in the shoe further palmarly than conventional shoes. This reduces the extensor moment arm, brings the GRF closer to the centre of rotation and reduces tension in the DDFT (Fig 3a). This concept of changing the point of breakover can be clearly demonstrated by creating a bevel in two pieces of wood that are of different thickness (Fig 3b).
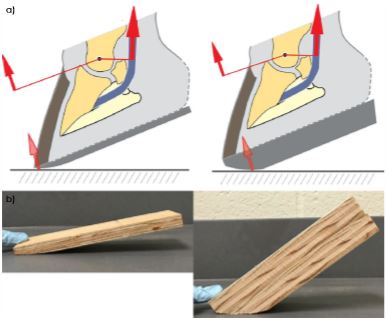 |
| Fig 3: a) The extensor moment about the DIPJ can be moved further palmarly in a wooden shoe when compared with a conventional horseshoe (Image courtesy of Andrew Parks). b) This Illustrates how the tilt (breakover) can be increased when a bevel is created in two pieces of wood of different thicknesses. Note the increased breakover in the thicker block. |
Furthermore, the bevel created around the perimeter of the wooden shoe will reduce the moment which decreases the force required to breakover in a medial or lateral direction with less stress on the tissues (Fig 4).
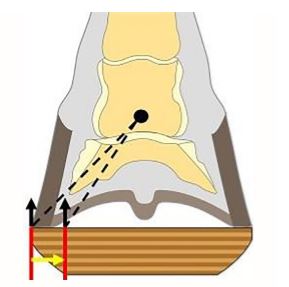 |
| Fig 4: This illustrates the bevel in the wooden shoe that shifts the GRF axially which decreases the moment about the DIPJ and enhances breakover in a mediolateral direction (Image courtesy of Andrew Parks). |
Construction of the shoe
The author prefers wood due to its accessibility, light weight, the ease with which it can be constructed/shaped (both before and after application), malleability and its ability to dissipate energy at impact while remaining rigid (Reid 1994). There are shoes available commercially that have an ethyl vinyl acetate (EVA) pad substituted for the thicker ¾ inch section of plywood that is beveled. EVA is an extremely elastic material that can be sintered to form a porous material similar to rubber yet has resilience. The compressibility of this material distributes the load across the surface of the foot, however, it does wear and compress unevenly relative to the load placed on the limb causing the angle and the forces on the foot to change. Although more time consuming, the author prefers to use wood which can be fabricated according to the conformation of the foot, the integrity of the structures and the radiographs. The wooden shoe can be constructed using any steel or aluminum shoe with a broad toe that is available in sizes 00–5 as a template.2 The basic shoe is made from two pieces of plywood. One piece of plywood is 6.3–9.5 mm (1/4–3/8 in) thick (depending on the thickness of the shoe required) and the second piece is 19 mm (3/4 in) thick. Using the aluminum shoe as a template, the thinner piece of plywood is cut out with a vertical border while the thicker piece is cut out with the border straight or beveled at a 30-degree angle across the palmar or heel section and a 45-degree angle around the perimeter of the block using an angle saw3 (Fig 5a).
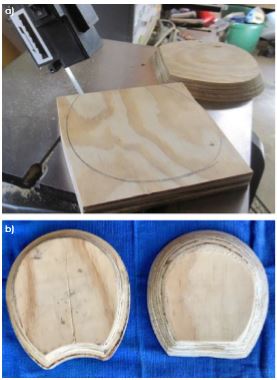 |
| Fig 5: a) Using a template to cut a shoe from a wooden block with an angle saw. b) Commercially purchased wooden shoe that has been reshaped to create the appropriate bevels using a belt sander or a grinder. |
The straight or decreased angle across the palmar section of the shoe prevents rocking backwards during landing. The two pieces of plywood are glued together with the thinner portion proximal and then two 1-inch drywall screws or wood screws are inserted on the ground surface of the shoe for additional security. A wood rasp or belt sander is used to blend the cut angles into a uniform smooth slope. Plywood can also be purchased in a solid 45 mm (1.8 in) thickness which eliminates the necessity to cut two pieces. Alternatively, the wooden shoe is available commercially and can be easily modified with a belt sander or a hoof rasp to match the wooden shoe that was described above3 (Fig 5b). Shoe height is dictated by the conformation of the hoof and the amount of displacement of the distal phalanx present, that is, the greater the rotation of the distal phalanx, the more shoe height is necessary in order to achieve the appropriate palmar placement of breakover. If the sole is prolapsed or the distal phalanx has penetrated the sole, a recess can be created in the dorsal foot surface of the shoe by cutting a half moon shape in the thinner piece of plywood using a router or a hand grinder to create a trough in the shoe below the area of the sole or bone that has prolapsed. If it is determined that heel elevation is required, the heels can be raised accordingly by applying a wedge pad to the foot surface of the wooden shoe. The angle of the wedge is usually 2–3 degrees depending on the amount of heel horn removed. The wedge pad is attached to the shoe with 1-inch drywall screws or wood screws. An alternative method to raise the heels is to cut the ground surface of the wooden shoe itself at an angle to the hoof surface.
Radiographs
Radiographs are essential when applying the wooden shoe. The lateral view evaluates the distal phalanx and related soft tissue structures of the foot in a sagittal plane while the dorsopalmar view evaluates these structures in a frontal plane. High quality radiographs are required to visualise the osseous structures, the hoof capsule and related soft tissue structures in order to evaluate any disease process, hoof conformation, the position of the distal phalanx within the hoof capsule, position of the DIPJ and especially the soft tissue structures. The radiographs are also used as a guideline for trimming the foot as well as positioning and applying the wooden shoe (Fig 6).
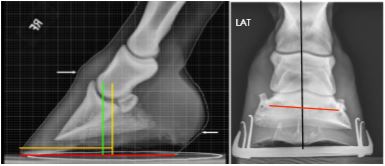 |
| Fig 6: A lateral and dorsopalmar radiograph view. The lateral radiograph shows good foot conformation where the yellow line is the centre of rotation and the green line is the widest part of the foot. DP view shows the distal phalanx displaced medially. |
The lateral radiograph is used to identify dorsal rotation or displacement of the distal phalanx when evaluating chronic laminitis but it does not allow identification of asymmetrical medial or lateral distal displacement of the distal phalanx (O’Grady et al. 2007; O’Grady 2010; Parks and O’Grady 2015). Therefore, a dorsopalmar (0-degree dorsopalmar) radiographic projection should always be included as part of the radiographic study for either acute or chronic laminitis.
The radiographic features of chronic laminitis are well documented (Redden 2003; Sherlock and Parks 2013). lateral radiograph will allow the clinician to assess the thickness of the dorsal hoof wall, the descent of the distal phalanx within the hoof capsule, the degree of dorsal rotation of the distal phalanx, the angle of the solar border of the distal phalanx relative to the ground, the distance between the dorsal limit of the solar margin of the distal phalanx and the ground and the thickness of the sole. The dorsopalmar radiograph will reveal if asymmetrical distal displacement of the distal phalanx on either the lateral or medial side is present and whether the width of the hoof wall is thicker than normal on the affected side. A useful template can be superimposed on the lateral radiograph and then transferred to the foot for use as a guideline for the appropriate trim and placement of the wooden shoe in cases of chronic laminitis (O’Grady and Steward 2009; Parks and O’Grady 2015) (Fig 7).
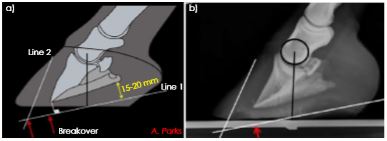 |
| Fig 7: a) A schematic illustration of a radiograph with dorsal capsular rotation showing the lines drawn parallel to the solar surface of the distal phalanx and the line drawn parallel to the parietal surface of the distal phalanx (Image courtesy of Andrew Parks). b) The illustration applied to a radiograph with dorsal capsular rotation. Black line represents COR. |
Application of the shoe
The trim
Before beginning the trim, the horse should be observed in motion, noting the degree of lameness, if present, on the straight and on turns. The strike pattern of the horse is determined whether the horse lands flat, markedly heel first, toe first or lands asymmetrically on one side of the hoof capsule. The initial step to trim the foot in all cases is to draw a line across the widest part of the foot. The widest part of the foot is 5–10 mm dorsal to the COR which makes it a good guideline to begin the trim. The frog is trimmed by removing any loose exfoliating horn and the hoof wall is rasped from the middle of the foot palmarly to where the hoof wall at the heels and the frog are on the same plane. This creates additional ground surface from the middle of the foot to the heels which moves the load in a palmar direction. In most cases where the wooden shoe is used, the dorsal section of the foot will be compromised with limited sole thickness, so the toe length can be reduced using the nippers in a vertical direction according to the radiograph or by rasping the dorsal hoof wall (O’Grady 2010; Parks and O’Grady 2015).
A template superimposed on a radiograph can be used as a guide when trimming the case with chronic laminitis (O’Grady 2010; Parks and O’Grady 2015) (Fig 7). The quarters and heels of the hoof wall are trimmed from the widest part of the foot palmarly to coincide with line 1 drawn distal and parallel to the solar margin of the distal phalanx on the radiograph. The solar surface of the foot dorsal to the widest part of the foot is not trimmed. The toe length is reduced from the dorsal hoof wall according to line 2 drawn dorsal to the parietal surface of the distal phalanx. If possible, the ideal end product when trimmed according to the template, will have two different planes on the ground surface of the foot with the heels of the hoof capsule and the frog on the same plane (Fig 8a). This method of trimming redistributes the load to the palmar section of the foot and functionally unloads the toe.
 |
| Fig 8: a) The two planes on the solar surface of the foot when trimming for realignment of the distal phalanx. Note the position of the block on the foot using the widest part of the foot as a guide. b) A wedge pad added to the wooden shoe for heel elevation (Image courtesy of Andrew Parks). |
Following the trim, the foot is placed on the ground and the horse is observed to see whether the heel of the foot is touching the ground at rest. In motion, the horse is observed for signs of lameness or increased lameness following the trim and whether it lands toe first in a straight line. If any of these signs are present, heel elevation will be necessary to compensate for the increase in tension in the deep digital flexor tendon caused by trimming the heels of the hoof capsule. Heel elevation is easily added to the wooden shoe using a wedge pad (O’Grady 2010; Parks and O’Grady 2015) (Fig 8b).
Fitting and applying the shoe
The foot surface of a wooden shoe is measured from dorsal to palmar drawing a line across the middle of the shoe. The correct size of the shoe is determined by superimposing the line drawn across the widest part of the foot and the line drawn across the shoe over each other; allowing the wooden shoe to extend marginally beyond the perimeter of the hoof capsule and 1–3 cm palmar to the trimmed heel. Using a 2 mm diameter drill bit, multiple guide holes are drilled from the solar surface proximally through the lateral and medial side of the hoof wall on the abaxial side of the sole wall junction (white line) beginning at the widest part of the foot and continuing towards the heel. Screws placed palmar to the widest part of the foot will maintain the two planes created by the trim and help unload the toe. These holes are predrilled in the solar surface of the foot to ensure accurate screw placement in the wall. The author prefers drywall screws, although they tend to be brittle, they are thinner in diameter and have a coarser thread. A 3.9 9 38 mm course thread tapered drywall screw or 4.2 9 38 mm tapered wood screw is placed in each hole on the outer hoof wall directed distally towards the ground surface and screwed in until just visible on the ground surface. Any exfoliating horn is removed from the frog and the frog sulci and the adjacent area is cleaned with a wire brush. Copper sulfate crystals (powder) are often applied to the cleaned area for its antiseptic properties before applying the impression material. To recruit the sole, bars, frog and frog sulci for weight bearing, deformable impression material (IM)4 is applied to the palmar section of the foot being careful that the impression material just covers the intended structures and does not extend beyond the bearing border of the foot surface to create pressure. With the foot off the ground, the shoe is now set in place, two or three screws are screwed into the shoe and the foot is placed on the ground to bear weight. This allows the impression material to conform between the palmar section of the foot and the shoe, thus creating two flat surfaces. After the remaining screws are inserted, additional screws can be placed in the wooden shoe against the outer surface of the hoof wall at the heels to act as struts to provide stability and act as an anchor for the casting tape. With the foot on the ground and using a rasp as a straight edge, a vertical line is viewed from the dorsal aspect of the coronary band to the ground, marked on the side of the wooden shoe and then a line is drawn across the ground surface of the shoe (Fig 9a).
 |
| Fig 9: a) A rasp positioned vertically dorsal to the coronet to mark the position of breakover. b) Breakover being created in the wooden shoe with a rasp at the designated point. |
Setting the breakover to this point in the shoe is easily accomplished by extending the bevel to this line using a hoof rasp with the foot being held between the farrier’s knees (so called farrier position) (Fig 9b). The line across the shoe is where the breakover point of the shoe should be positioned which will consistently be just dorsal to the solar margin of the distal phalanx when viewed on a radiograph (Fig 10).
 |
| Fig 10: Wooden shoe applied to the foot with corresponding lateral radiograph. Black line is the COR that correlates with the widest part of the foot and red line is the position of breakover. Note the screw placed against the out side of the hoof wall at the heel termed a strut to anchor the casting tape. |
Orthopaedic felt or impression material is placed across the bulbs of the heels and 2-inch casting tape5 is applied around the perimeter of the foot forming an attachment between the hoof wall, screws and wooden shoe. The casting tape provides circumferential stability that when attached to the screws not only adds security but may decrease flaring of the hoof wall during weight bearing that appears to pull the sole distally (Thomason 2007; O’Grady 2010; Parks and O’Grady 2015). Following application of the wooden shoes, horses are allowed brief periods of controlled exercise according to their comfort level. The exercise can be in the form of hand walking or turn out in a small paddock. Horses are radiographed at 4-5 weeks to assess improvement of the soft tissue structures and the wooden shoes left in place until the desired results are achieved, reset if necessary or transferred to conventional shoes (Fig 11).
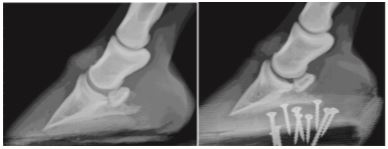 |
| Fig 11: Radiographs show the conformation of the foot before application of the wooden shoe and the change in the soft tissue structures 4 weeks after application. |
Unilateral displacement of the distal phalanx
Unilateral displacement of the distal phalanx in a mediolateral direction commonly occurs because of overloading one side of the foot or from laminitis. Unilateral displacement can occur in two clinical scenarios. The first context is less recognised where one side of the foot is overloaded and the distal phalanx descends. Here, the limb conformation of the horse leads to an asymmetric landing which causes disproportionate loading on one side of the foot. Hoof characteristics would include an offset foot, a sheared heel, compressed growth rings and decreased growth at the coronet above the displaced heel (Fig 12a).
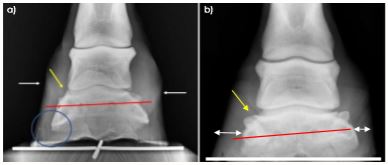 |
| Fig 12: a) A radiograph of a foot with unilateral displacement without laminitis. Red line is the tilt of the bone, yellow arrow is widened joint space, circle is decreased sole thickness and white arrows are position of coronet noting proximally displaced heel on affected side. b) A radiograph of unilateral displacement with laminitis. Note the difference in hoof wall thickness with the affected side increased. |
In the second scenario, the horse will have clinical signs of laminitis, radiographic evidence of not only displacement or rotation in the dorsal section of the foot but also unilateral displacement of the distal phalanx as noted on the DP radiographic view. The hoof wall on the displaced side of the foot will be thickened compared with the contralateral side due to the diseased lamellae (Sherlock and Parks 2013; Parks and O’Grady 2015) (Fig 12b). Based on the apparent asymmetry of the distal phalanx within the hoof capsule visible on radiographs, a clinician’s first response might intuitively be to try and restore the asymmetry of the distal interphalangeal joint and the position of the distal phalanx in relation to the ground. This would most readily be accomplished by raising the side of the hoof on which the distal phalanx is displaced. However, this practice will increase the weight bearing on the affected side and cause the distal phalanx to displace further in relation to the hoof capsule, along with increased discomfort. Horses with unilateral displacement show an increased distance between the distal phalanx and the hoof wall on the affected side which indicates weight bearing by the wall on the displaced side would have increased leverage on the hoof capsule, thus potentially shifting the centre of pressure towards the affected side. Theoretically, the hoof capsule can be stabilised in relation to the distal phalanx by increasing weight bearing on the contralateral side and reducing weight bearing on the affected side. Biomechanically, the weight of the horse is opposed by the GRF which is exerted on the foot at every point of contact. The GRF acts on the foot through the COP, therefore, changing the placement of the shoe should effectively change the centre of pressure. The COP is important because it determines the distribution of stresses within the hoof; therefore, changing the position of the wooden shoe will cause an asymmetrical redistribution of pressure on the ground surface of the foot that will change the COP (Fig 13a). The author has been successful in controlling mediolateral displacement by setting the wooden shoe wide on the unaffected side (O’Grady et al. 2007; O’Grady 2010; Parks and O’Grady 2015).
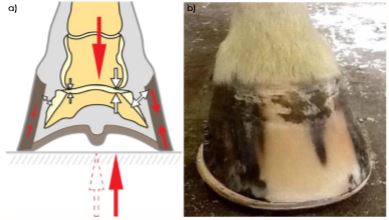 |
| Fig 13: a) The biomechanical concept of moving the COP (Image courtesy of Andrew Parks). b) The extension of the wooden shoe on the unaffected side of the foot. |
The foot is trimmed as described above making sure the hoof wall and frog are on the same plane and that either the lateral or medial hoof wall is not lowered more than the other. Any significant flare on the affected side of the foot is reduced with a rasp from the outer hoof wall and impression material is placed in the palmar section of the foot to make it load sharing. The wooden shoe is fitted to the foot such that it is flush or tight on the affected side and then forms a 6.3–9.5 mm (1/4–3/8-in) extension beyond the perimeter of the wall on the unaffected side of the foot (O’Grady et al. 2007; O’Grady 2010; Parks and O’Grady 2015) (Fig 13b).
Conclusions
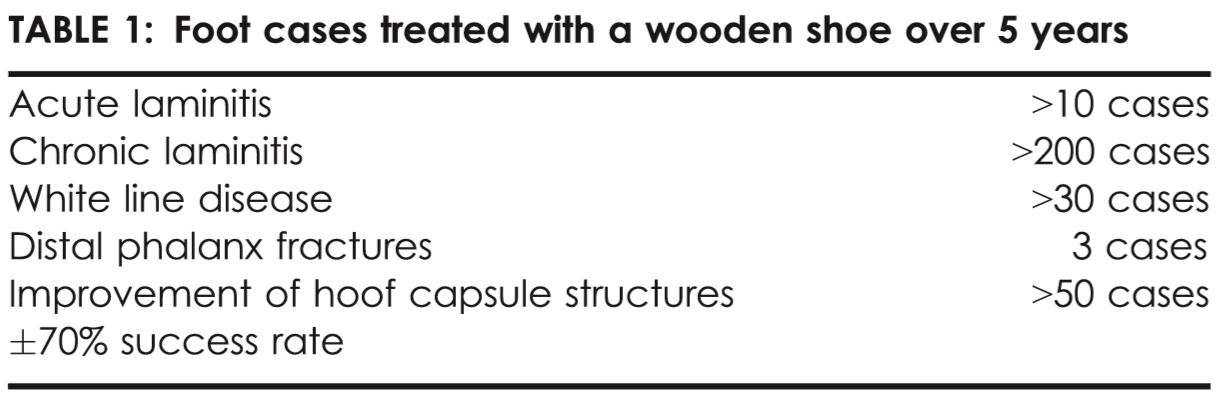
The wooden shoe provides another consistently effective farriery option when treating a variety of foot problems especially laminitis. The case selection in this paper deliberately excludes laminitis patients deemed to have a very poor prognosis. The author, and many of his colleagues, contend that, for welfare and ethical reasons, such horses are euthanasia candidates and should not be subjected to additional pain and suffering with little to no chance of success. Horses selected, although painful, were judged to have sufficient integrity of the hoof structures in which to apply the appropriate trim and use the biomechanical aspects of the wooden shoe to get improvement. Results from the authors practice and consulting service during the last five years treating acute and chronic laminitis, white line disease, distal phalanx fractures and improving the structures using the wooden shoe in a large number of cases showed consistent improvement which was considered a success (Table 1).
 |
The magnitude of the bevel of the wooden shoe decreases the stress on the entire circumference of the lamellae and soft tissues at breakover, an effect which is often difficult to produce with traditional shoes. Cutting the perimeter of the wooden shoe at a 45-degree angle or bevel around the circumference of the shoe appears to decrease the dorsal/lateral/medial torque on the lamellae, especially when the horse turns. The flat firm plane of the wooden shoe, combined with the impression material in the palmar section of the foot, allows load sharing across the ground surface of the foot which further decreases the load borne by the dorsal hoof wall. This concept of load sharing is very helpful in a horse with compromised foot conformation that has limited viable hoof structures in a given section of the foot. Furthermore, therapeutic shoes are often deficient in providing sufficient breakover and heel elevation due to the physical limits of the particular shoe, whereas increasing the height of the wooden shoe allows the desired biomechanics to be fabricated into the shoe. For this author, the wooden shoe has been a very effective farriery option for treating a variety of conditions. Given that the principles behind the application of any shoeing technique are more important than the technique itself, clearly there is more than one way to accomplish many of the intended goals. The simplicity of construction, ease of adaptation, combined with the light weight in relation to height provides advantages that are often hard to match with a traditional steel or aluminum shoe. Therefore, in the author’s practice, it has become the method of choice for treating horses with acute and chronic laminitis, while line disease, distal phalanx fractures and certain distortions of the hoof capsule.
Author's declaration of interestsNo conflicts of interest have been declared.
Ethical animal researchNot applicable.
Declaration of EthicsNot applicable.
Source of fundingNone.
Manufacturers' addresses1Equicast, Inc. 575 SE Broad Street Southern Pines, North Carolina, USA.
2EDSS Inc, Penrose, Colorado, USA.
3Sears, Roebuck and Co., Hoffman Estates, Illinois, USA.
4Equilox, Inc. Pine Island, Minnesota, USA.
53M Animal Care Products, St Paul, Minnesota, USA.