How to Manage a Quarter CrackReprinted with permission from the American Association of Equine Practitioners. |
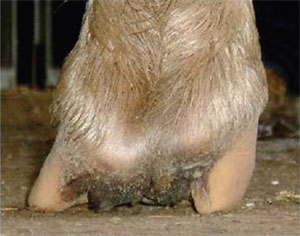 |
| Fig. 1. Palmar view of a foot with a sheared heel. Note the disparity between lateral and medial heel length and the compression of the structures above the medial heel. |
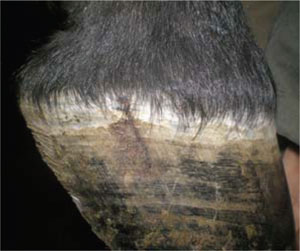 |
| Fig. 2. An acute quarter crack. Note the bleeding. |
2. Foot Conformation
Sheared heels can be defined as a hoof-capsule distortion resulting from displacement of one heel bulb proximally relative to the adjacent heel bulb (Fig.1).5-8 This disparity between the lateral and medial heel bulb is generally 0.5 cm or more.9 When the weight of the horse is not distributed uniformly over the entire hoof during the landing phase of the stride, one focal area of the foot, usually a heel and accompanying heel quarter, receives a disproportionate amount of the total load. This resultant force leads to a remodeling of the affected heel bulb.The degree of distortion in the affected heel is dependent on the amount of the load sustained by the individual foot. Sheared heels can occur in the hind as well as the forefeet. This continual disproportionate load and the increased compressive stresses placed on one side of the foot predispose the foot to injury such a quarter crack (Fig. 2).5
3. Structural Changes to the Foot
The equine hoof capsule is a viscoelastic structure that has the unique ability to deform when weight is accepted uniformly.10 However, if the unequal load is continually placed on one quarter/heel, over time, structural changes will become apparent. The increased load on one side of the foot causes the hoof wall to assume a steeper angle (that is, the wall becomes straighter). Along with the increased hoof-wall angle, other changes, such as contracture of the heel subjected to the greater load, will soon follow. This decreases the ground surface of the foot, resulting in a lack of expansion on that side of the foot and making the solar surface in the palmar/plantar section of the foot asymmetrical. Overtime, the hoof wall begins to roll under on the affected side, which further decreases ground surface under that area of the foot. The side of the foot that first impacts the ground develops a flare because of bending of the hoof tubules.
Over time, the stresses placed on the overloaded side of the foot exceed the ability of the hoof wall to deform.10 The submural tissue on the affected side will be subjected to excessive compressive forces that result in hemorrhage along with stretching or tearing of the lamellae. It is thought that the exudation of fluid in the submural tissue increases pressure and will eventually disrupt the coronary corium, consequently leading to the formation of a quarter crack. Furthermore, a recent study of a group of horses with quarter cracks showed the free margin of the ungual cartilage above the coronet resulting from the displaced quarter/heel to be less than 15 mm.11 This lack of free margin seems to prevent lateral expansion of the ungual cartilage,leading to increased pressure in the sheared heel and trauma to the adjacent coronet.
4. Mechanism
The presence of a sheared heal indicates a disproportionate weight distribution over a section of the hoof that anatomically cannot resist the additional stresses without distortion or displacement. Horses with conformation that causes the limbs to land and load asymmetrically across the hoof will be subject to this type of deformation. The growth rate around the circumference of the hoof is usually approximately uniform, but regional disturbances ingrowth rate can occur to either increase or decrease growth. The position of the coronary band is related to the balance between hoof wall growth at the coronary band and the rate of migration of the hoof wall distally. Furthermore, the rate of migration of the hoof wall is a balance between an active process occurring in the lamellae to cause them to move distally and the force on the wall from the ground reaction force. Clinical evidence suggests that hoof wall growth is at least in part, if not predominantly, inversely determined by the force of weight bearing at the ground surface of the wall. If the rate of hoof wall growth exceeds the rate of migration distally, the coronary band displaces proximally. This appears to be the mechanism in horses with sheared heels/quarters. Due to the fact that the growth rings below the coronet are usually very close together where the hoof wall is displaced and that the slow hoof wall growth is most likely related to increased weight bearing (force) by the wall; this would suggest that the wall is forced proximally. Whether or not this is a real phenomenon as suggested by clinical experience has not been confirmed in a scientific manner.
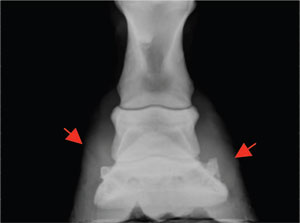 |
| Fig. 3. DP radiograph of a foot with sheared heels. Markers placed at the coronary band of the heels show the different heel height while the distal phalanx remains parallel with the ground. Note that the distal phalanx is offset to the lateral side. |
It was assumed for years that inappropriate farrier practices may lead to sheared heels when trimming methods such as leaving the heels long or excessively lowering one side of the foot would result in excessive forces/stresses being placed on a given section of the foot. The term used to discribe this type of hoof capsule distortion was a lateral medial imbalance. To substantiate this theory, the author reviewed 50 dorsopalmar 0° (DP) radiographs on horses that had a foot with one heel bulb displaced proximally 0.5 cm or greater. In all cases, it was found that the solar surface of the distal phalanx was approximately horizontal (parallel) with the ground, indicating that the disparity in heel height was not originating from the hoof wall and sole located beneath the distal phalanx in the heel (Fig.3). Also, the distal phalanx occupies the dorsal section of the hoof capsule anatomically, whereas the majority of the space in the palmar/plantar foot is occupied by soft tissue (Fig. 4). The displacement of the heel occurs palmar/plantar to the body of the distal phalanx in the section of the hoof comprised of soft tissue. This may account for the proliferation of soft tissue and the additional hoof-wall growth occurring above the ground surface of the foot.
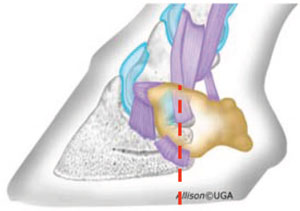 |
| Fig. 4. This illustration shows the ratio of bone to soft tissue in the foot. The hoof-capsule distortion noted in a sheared heel will involve the soft-tissue structures palmar to the distal phalanx. Note the dotted line. (Courtesy of Dr. Andrew Parks.) |
 |
| Fig. 5. Foot shows focal proximal displacement of coronet at the origin of crack, which coincides with the illustration in figure 4. This is the point of maximum stress. |
5. Etiology
To formulate a rational approach to management, it is necessary to discuss the etiology of sheared heels.Traumatic wounds to the coronary band in the palmar/plantar region of the foot often lead to a quarter crack. Treatment here involves appropriate wound care and stabilization of the coronet to promote healing.Inappropriate farrier care or lack of appropriate farriery over time may contribute to the formation of a quarter crack. Inappropriate farriery may lead to hoof-capsule distortions where the forces/pressure on a given section of the foot become excessive, leading to a hoof-wall defect. Conformational faults in the upper limb that change the horse's flight phase of the stride lead to a hoofcapsule distortion termed sheared heels. The presence of a sheared heel combined with a spontaneous quarter crack seems to provide ample evidence that this type of hoof-capsule distortion plays a major role in the etiology. Sheared heels seem to result from unequal loading of the foot as it impacts the ground. In this instance, the altered flight pattern causes the horse to impact the ground with one side of the foot before full weight-bearing on other side of the foot. This focal disproportionate weight-bearing displaces the heel bulb proximally, creating the unequal heel height. In the conformationally predisposed horse, the horse will generally have a narrow chest, and the carpus will be rotated laterally.When viewed from the front, although the entire limb faces outward or in some instances, medially,the axial alignment of the limb from the carpus to the ground surface of the foot forms a straight line,indicating a rotational deviation of the limb. With the knee facing outward, it changes breakover such that it occurs in an outward or lateral direction, thus changing the optimal straight flight path of the foot during the stride so that the foot is unable to land under the horse evenly on both heels. As the horse approaches the landing phase of the stride, this flight pattern forces the foot to contact the ground on one side of the foot and then sustain excessive load on the opposite side. Using a slow-motion video camera, one can actually distinguish the point where the foot impacts the ground on one side and the point where the hoof loads the surface on the other side. Quarter cracks usually occur directly above the point of the greatest load and most force within the hoof wall. This point can be readily observed, because there will be a small focal displacement in the coronet proximally above the quarter crack (Fig. 5). Furthermore, there seems to be a correlation between an offset distal phalanx and sheared heels. Most commonly, the distal phalanx is offset laterally within the hoof capsule rather than directly under the proximal and middle phalanges, causing the medial side of the hoof capsule to assume more load.
6. Observation
The evaluation of sheared heels begins with visual assessment of the hoof and limb conformation with the horse standing on a hard, level surface. The gross changes noted in the foot are proportional to the amount of continual load sustained, the extent of structural damage, and the duration of the condition. When sheared heels are present, the heel bulb on the affected side is displaced proximally when viewed from behind the horse. When viewed from the front, the hoof wall on the affected side is straighter and in chronic cases, will begin to roll under the foot. There is a marked flare of the hoof wall present on the side opposite the affected heel. When viewed from the side, the coronary band is displaced proximally above the damaged heel instead of having a gradual uniform slope from the toe to the heel. The solar surface of the foot reflects changes elsewhere in the hoof capsule. The foot will be less symmetrical; the sole in the quarter and heel area will appear wider on the side with the flare and narrower on the side with the sheared heel.It is important to view the horse in motion, again on a hard, level surface, from the front and rear. This should be done at a walk and a trot. When viewed from behind, this should determine which section of the foot is contacting the ground initially and which portion of the foot is receiving the impact. The direction of breakover should be noted when viewed from the front.
7. Farriery
Farriery is directed to unloading the hoof wall and decreasing the forces on the side of the foot with the quarter crack. This is accomplished by improving the conformation of the hoof, trimming methods,and applying the appropriate shoe. When a horse develops a full-thickness quarter crack, it is advisable to take the animal out of training to allow healing, but this is not always an option with competition horses. There will also be constraints placed on the farriery because of the training and competition schedule of the horse. For example, the author likes to remove the shoes and stand the horse on a hard surface for 24 h before trimming and shoeing the horse. This alone allows the affected side of the foot to settle into a more acceptable conformation. Furthermore, when possible, the author will perform the farriery and wait for the coronet to settle into a more acceptable position or slope before a repair is considered. If the repair is performed immediately, the defect is fixed with the coronet in a displaced position.
When infection is present, it is characterized by marked lameness, pain on palpation, and a swollen discolored coronary band above the defect. Occasionally, exudate can be expressed when digital pressure is applied to the coronet. Infection often occurs shortly after a defect is patched with some type of composite that generates heat. If infection is present, the patch (if present) is removed, the crack should be opened for drainage, and the foot is bandaged with a suitable disinfectant agent for at least 48 h.
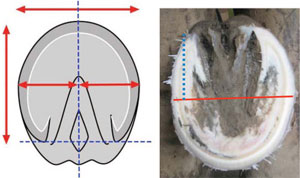 |
| Fig. 6. This illustration shows proportions of a well-trimmed foot. A foot with a sheared heel shows increased ground surface on the affected side after trimming (blue line). |
Farriery is initiated by removing the shoes and again observing the horse walking on a hard surface, noting the strike pattern of the foot. The foot is trimmed appropriately using the guidelines of a parallel hoof-pastern axis, and the center of articulation and heels of the hoof capsule are trimmed to include the base of the frog. To start, a line can be drawn across the widest part of the foot with a felt-tip pen.The frog is trimmed to where it is pliable, and the quarters and heels of the hoof capsule from the middle of the foot are rasped palmarly so that the heels of the hoof capsule and the trimmed frog are on the same plane. An attempt is made to create as much ground surface under the affected heel as possible,which will result in that side being marginally lower than the other side of the foot. The toe and quarters are reduced appropriately so when the trim is completed, the surface area on either side of the line drawn on the widest part of the foot will be approximately equal (Fig. 6). Lowering the heel on the displaced side of the foot is logical, because it is the taller heel and it increases the ground surface of the foot on that side. Bearing in mind that the mechanism that accounts for this foot conformation is not completely understood, the trim is based on clinical impressions having successfully treated a large number of cases. After the trim, the horse is again walked on a hard surface, and some improvement in the landing pattern will be noted.
Any horse with a full-thickness quarter crack should be placed in a bar shoe, if possible. Various configurations of bar shoes, such as a straight-bar, heart-bar, or Z-bar shoe, can be used. All of these shoes effectively increase the surface area of the foot, provide palmar/plantar support, and decrease the independent vertical movement at the bulbs of the heels. No nails are placed palmar to the defect in the foot.
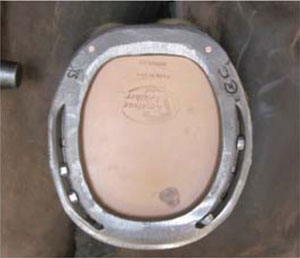 |
| Fig. 7. Straight-bar shoe with a leather pad. |
 |
| Fig. 8. Straight-bar shoe with heel unloaded. Note the taper from the quarter to the heel. |
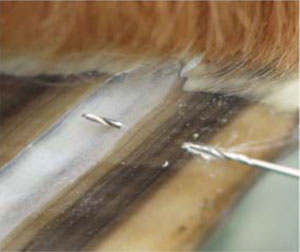 |
| Fig. 9. Hole being drilled into the ledge created in the debrided quarter crack. |
The author's choice is a wide web-steel straightbar shoeb fitted symmetrically to the trimmed foot, and a leather pad is attached to the shoe (Fig. 7).Before applying the shoe, the medial quarter and heel of the affected side of the foot is further lowered in a tapered fashion with a rasp. Impression materialcis placed in the palmar section of the foot from the apex of the frog palmarly, except under the medial heel. The shoe is then attached to the foot.Lowering the hoof wall at the quarter/heel will create a space between the shoe and the hoof wall on the medial side (Fig. 8). This improves the foot conformation, the landing pattern, unloads the medial heel, and allows the heel bulb to settle down and assume a more acceptable position.
8. Repairing the Defect
The use of a composite (with fiberglass) alone may not provide sufficient stability for a quarter-crack repair. Combining an implant with the composite in the repair increases the strength and durability of the repair. Types of implants described previously include fiberglass and screws, screws and wires, various suture patterns, and clamps that apply tension across the crack.12-15 These methods have been somewhat cumbersome; the screws present a risk,because they often impinge on the dermis and uniform tension is rarely achieved across or within the defect.
When a decision is made to repair the quarter crack, the hoof wall should be thoroughly cleaned and dried. The defect is explored through its entire length using a Dremel toold with a tungsten carbide bit, being careful not to create any unnecessary hemorrhage. All loose undermined horn should be removed, the defect is widened, and the burr is used to create a solid ledge on either side of the trough.The hoof surface on either side of the defect should be sanded with a coarse sanding block. Two sets of paired 0.047-in holes spaced 0.25-in apart are then drilled across from each other on either side of the crack beginning at least 0.375-0.500 in from the margin of the crack and ending within the ledge of the trough (Fig. 9). Stainless steel wire formed in a hair-pin shape 2.5-in long with a small steel tab on each wire unit is commercially available.e One wire unit is passed through the holes from a palmar to dorsal direction, and another wire unit is passed through the opposing holes in a dorsal to palmar direction into the depth of the crack. The ends of the wires are pulled tight and bent outwards. The tab placed on the wire unit will now lie against the outer hoof wall. This prevents the wires from cutting into the hoof wall. Additional sets of these wire units can be used according to the length of the defect or until the desired stabilization is achieved.
The internal length of the defect usually exceeds the external length, and therefore, it cannot be completely eliminated, thus allowing a portal of entry into the submural tissue. This necessitates some form of drain or interface between the composite and the floor of the defect. If the interior of the crack is soft and pliable or if hemorrhage has been encountered,a drain should be used. A drain or interface can be placed in the defect before it is covered with the composite. A small amount of medicated puttyf is rolled into a tubular shape the length of the trough and placed within the debrided defect to act as an interface. If a drain is desired, thin rubber flexible tubing is pressed into the putty. The tubing will exit at the coronary band and below the crack to form the drain. The ends of all the opposing wires are now joined together and twisted until resistance is felt. The excess wire in front of the twist is cut off within the defect (Fig. 10, A-C).There should be no movement in the hoof wall on either side of the crack when digital pressure is applied.
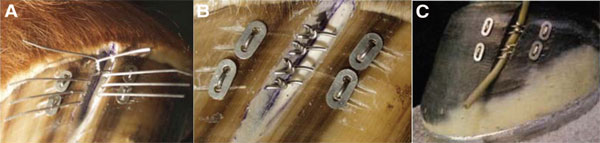 |
| Fig. 10. (A-C). A shows the wires joined together and being twisted. B shows the wires cut just above the twist. C shows the completed implant with a drain. |
The completed implant is now covered with a composite patch. Elastic adhesive tape is placed around the coronary band to prevent irritation from contact with the composite. The polymethylmethacrylate (PMMA)d composite is mixed thoroughly with strands of fiberglass, the mixture is placed on a section of plastic wrap, and it is applied over the implant. The composite is molded into the desired shape through the plastic wrap and then covered with a cohesive bandage placed around the hoof wall to compress the composite. On completion of the cure cycle, which takes 2-3 min depending on the ambient temperature, the rubber drain is removed, and the repair is sanded to remove excess composite.
9. Discussion
The importance of determining the underlying cause and implementing the appropriate farriery cannot be overemphasized when managing a quarter crack. The strong association of sheared heels with limb conformation and the landing pattern of the horse when a quarter crack is present is hard to ignore. Assessing the limb conformation, improving the foot conformation, and applying the appropriate shoe seem to be as important as the repair technique used for the defect. Inadequate attention to these factors may account for the many failures encountered and the recurring nature of quarter cracks. The use of a composite (with fiberglass) alone may not provide sufficient stability for a quarter-crack repair to heal. Combining an implant with the composite in repairing a defect increases the strength and stability of the repair. Types of implants described previously include fiberglass and screws, screws and wires, various suture patterns, and clamps that apply tension across the crack.12-15 These methods have been somewhat cumbersome; the screws present a risk, because they often impinge on the dermis and uniform tension is rarely achieved across or within the crack.
The advantage of the repair method described in this paper is that the procedure is exceptionally strong and increases stability while being relatively simple and easy to learn. Additionally, the wires are placed from opposing sides of the defect and joined together within the defect, creating uniform tension within the crack. Another advantage of this technique is that, because the implant is contained within the hoof wall, there is very little metal on the surface of the hoof wall to interfere with the adhesion of the composite.
References and Footnotes