Managing Quarter CracksThere's more to dealing with these defects than just patching them -you need to identify and correct the causeReprinted wih permission of the American Farriers Journal. Original published in the July / August issue of the journal.By Stephen E. O'Grady, DVM, MRCVS Quarter cracks are a common type of hoof capsule defect. Quarter cracks often cause foot lameness and/or decreased athletic performance in race and sport horses. They typically originate at the coronary band in the quarter of the hoof and progress distally. The defect is full thickness, extending into the submural tissue of the hoof, which leads to instability, inflammation and/or infection. Assess The Quarter Crack Quarter cracks can be painful due to infection, instability caused by forces placed on or within the crack or by movement of the section of the hoof wall palmar/plantar to the crack. The vertical movement of the heel bulb on the affected side further contributes to this instability. Causes of quarter cracks may include trauma to the coronary band, preexisting damage to the submural tissue from infection, inappropriate limb conformation, abnormal hoof conformation and a landing pattern in which disproportionate forces are placed on the foot as it strikes the ground. There are two approaches that can be used to resolve quarter cracks. Giving the horse time off, correcting the cause using appropriate farriery and allowing the defect to grow out is the ideal approach. But often, the problem facing equine practitioners and farriers is that many of the horses that develop quarter cracks must continue to perform. For them to do this, it is essential to combine farriery with a repair that provides strength and stability to the hoof-wall defect, allowing the horse to perform and at the same time promoting healing, so that the crack will grow out. Various techniques for repairing hoof cracks have been described.1, 2, 3 This article will focus on the causes of quarter cracks and the appropriate farriery. It will also describe a simple, consistent method of repairing quarter cracks that, when combined with appropriate farriery, gives superior stability.4 Correct The Cause For successful resolution of a hoofwall defect, it is necessary to determine the underlying cause of the quarter crack and to correct it where possible. There is always a combination of factors that must be considered when outlining a treatment plan. Horses with low- or underrun-heel conformation appear to be prone to quarter cracks. This type of heel will be structurally weak due to inadequate hoofwall mass.
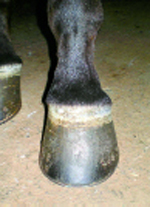
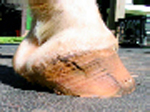
This will create insufficient ground surface to adequately allow the horse to accept forces in the palmar/plantar part of the foot. On the other hand, with the upright hoof or clubfoot conformation, the heels grow long, bypassing the frog, and the energy of impact is placed directly on the hoof wall. Horses with an offset hoof conformation will always bear more load on one side of the foot ( Figure 1) and be more susceptible to a quarter crack. Short shoes decrease the ground
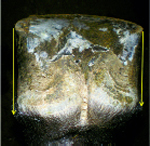
section, placing the weight-bearing surface in front of the vertical axis of the limb. In such instances, a vertical line drawn from the origin of the quarter crack will invariably coincide with the end of the shoe. Of utmost importance is the landing phase of the stride. Horses that develop a quarter crack will land asymmetrically, impacting first on one side of the hoof and then loading the opposite side.5 This type of landing pattern places excess forces on one side of the hoof wall and results in the sheared-heel conformation in which the heel bulb on the affected side is displaced proximally 6 (Figures 2A, 2B). In fact, it is rare to see a horse with a quarter crack that is not accompanied by a sheared heel on the affected side. This type of strike pattern is generally related to either limb or foot conformation. The landing pattern and the sheared heel conformation of the foot may also perpetuate quarter cracks caused by trauma to the coronary band or a previous abscess. Pathogenesis The most logical pathogenesis for a quarter crack is that when excessive stress (forces) are placed on a localized section of the hoof over time; this exceeds the ability of the hoof wall to deform. The excessive load over time leads to tearing of the lamina, bleeding and exudation in the submural tissue, resulting in pressure that moves toward the coronet, creating a disruption of the coronary corium and leading to a defect at the coronary band. In fact, the term crack may be a misnomer, as it may be actually be a failure of new horn tubules at the coronet, leading to the defect in the hoof wall. An observant veterinarian, farrier or trainer can often note this phenomenon. A given horse may be lame and the coronet on the affected side swollen and painful on palpation. A closer look will show the coronary band to be discolored and the hair covering the coronet standing straight out instead of laying flat against the top of the hoof. These horses will generally show a hoof-tester response over the wall on the affected side. If a medicated poultice a is applied to the foot for 24 hours, a quarter crack will often be present when the bandage is removed. Farriery Any horse with a quarter crack should be observed in motion on a hard surface both before and after the feet are trimmed to evaluate the landing pattern of the foot. If the long-toe, underrun-heel conformation or club-foot conformation is present, it is essential to attempt to improve the foot conformation. One of the goals of this should be to create more ground surface in the palmar section of the foot, especially on the affected side and relocate breakover to the proper position.
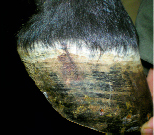
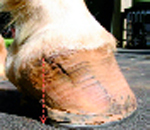
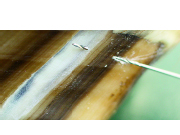
When considering sheared heels, it should be noted that if the heels are measured from the end of the hoof wall at the heels to the hairline at the bulbs, the heel that is displaced proximally will be the longer heel. Therefore, the hoof wall is always lowered on the side that is displaced proximally. Lowering the hoof wall of the quarter and heel on the side with the quarter crack will increase the ground surface of the hoof wall in that area, decrease the amount of impact when the foot strikes the ground and improve the landing pattern. Any horse with a full-thickness quarter crack should be placed in a bar shoe, if possible. Various configurations of bar shoes can be used such as a straight-bar - which is always the authors' choice - egg-bar, heart-bar or Z-bar shoe. All of these shoes effectively increase the ground surface of the foot, provide palmar/plantar support, allow the affected quarter/heel to be unloaded and decrease the independent vertical movement at the bulbs of the heels. No nails are placed palmar/plantar of the defect. Initially, the author will often use aluminum glue-on shoes on many horses with quarter cracks.7 Gluing the shoe offers several advantages. First, it allows the foot to be trimmed and shod to the most suitable foot conformation. Second, gluing on the shoe allows for more expansion to be provided under the quarter and heel, thus increasing ground surface. Finally, when shoes are glued on, there is no concern with nail placement in the affected quarter/heel. The Repair A full-thickness quarter crack should be thought of as a fracture of the hoof wall and therefore an implant should be incorporated into the repair, rather than just placing a fiberglass patch over the defect. When a full-thickness quarter crack is present, it is the author's opinion that the repair should be delayed for a few days following the horse being trimmed and shod. This is because the coronet will have been displaced proximally above the quarter crack and should be allowed to settle back into place and assume a more normal slope of the coronet before a repair is put in place ( Figures 3A, 3B). When infection is present, it is characterized by marked lameness; pain on palpation and a swollen discolored coronary band above the defect. Occasionally, exudate can be expressed when digital pressure is applied to the coronet. If infection is present, veterinary input may be advantageous to the farrier. An infected quarter crack should be opened to establish drainage and bandaged with 2% iodine, or a similar disinfectant agent, for at least 24 to 48 hours before the repair. When starting the repair, the hoof wall should be thoroughly clean and dry. The quarter crack is opened its entire length using a Dremel tool b with a tungsten carbide bit, with care taken (especially near the coronary band) not to create any unnecessary hemorrhage. The created trough should be of sufficient depth to accommodate communicating drill holes. All necrotic and loose horn should be removed. The hoof surface on either side of the defect should be sanded using the Dremel tool with a coarse grit drum sander. Two sets of paired 3/64-inch holes, 1/4-inch apart, are then drilled parallel to the coronary band on either side of the crack beginning at least 1/2 inch from the margin of the trough and ending within the depths of the debrided crack across from each other ( Figure 4). A section of 2 1/2-inch long stainless steel (21-gauge) wire is bent into a "hairpin" shape and a small steel tab is placed on each wire unit. One wire unit is passed through the holes from palmar to dorsal direction and another wire unit is passed through the opposing holes in a dorsal to palmar direction into the depth of the trough. The ends of all the wires are pulled tight and bent outward. The tab placed on the wire unit will now lie against the outer hoof wall. This prevents the wires from cutting into the hoof wall. Additional sets of these wire units can be used according to the length of the defect or until the desired stabilization is achieved.
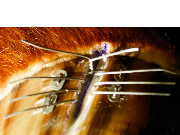
A full-thickness quarter crack leads into the dermis and cannot be completely eliminated, thus necessitating the need for a drain. To place a drain, a small amount of medicated putty c is rolled into a tubular shape and placed within the debrided trough. A piece of 1/8-inch hollow- rubber, flexible tubing or other suitable plastic string (such as Weed Eater string) is pressed into the putty and will exit at the coronary band to form the drain. The ends of all the opposing wires are now joined together and twisted until resistance is felt (Figure 5A, 5B). The excess wire in front of the twist is cut off within the defect. There should be no movement in the hoof wall posterior to the crack when digital pressure is applied. Elastic adhesive tape is now placed around the coronary band to prevent contact with the composite. Strands of fiberglass are cut into various lengths and thoroughly mixed with a polymethylmethacrylate composite (PMMA). d Using the strands of fiberglass mixed in the composite rather than the sections of fiberglass impregnated with the composite provides more structural strength and better adhesive properties to the hoof wall. The composite is applied to the prepared area of the foot, being sure to fill the quarter crack and incorporate the wires. The composite is covered with plastic wrap and the composite is molded into the desired shape using both thumbs. Upon completion of the cure cycle, which is dependent on the ambient temperature, the rubber drain is removed and the repair is rasped or sanded to remove excess composite. Discussion
Combining an implant with the composite/ fiberglass when repairing a quarter crack increases the strength and durability of the repair. Types of implants described previously include fiberglass and screws, screws and wires, various suture patterns and clamps that apply tension across the crack.1, 2, 3 These methods have been somewhat cumbersome; the screws present a risk as they often impinge on the dermis and uniform tension is rarely achieved across or within the crack. The advantage of this method is that the wires are placed from opposing sides of the defect and joined together within the defect, creating uniform tension within the crack. The wires are also incorporated into the composite as part of the repair. Another advantage is that, since the implant is contained within the hoof wall, there is very little metal on the surface of the hoof wall to interfere with the adhesion of the composite. The placement of a drain effectively decreases the risk of infection under the repair. The importance of determining the underlying cause, proper trimming of the feet and applying the appropriate shoe cannot be over emphasized when treating a quarter crack. The increased palmar/plantar ground surface provided by trimming and the appropriate shoe is as important as the repair of the hoof wall defect. The farriery techniques described here for resolving quarter cracks have produced consistent results and horses are able to return to immediate soundness. In addition, when it is necessary for the horse to perform, horses treated with appropriate farriery and the quarter-crack repair technique outlined in this paper have been able to return to successful competition following the repair with no infection, reoccurrence or bond failures being noted. Acknowledgements I would like to thank my colleague, Mr. Ian McKinlay. for bringing the repair technique described in this paper to my attention over 10 years ago. References
Footnotes
|