| A Conservative Approach to Treating a Quarter Crack A Case Report Stephen E. O’Grady, DVM My approach to treating a horse with a quarter crack is to determine and address the cause of the defect. Obviously, with an upper level horse that develops a quarter crack and has to compete; the farriery is usually changed and the defect is repaired. Otherwise, I prefer to take the horse out of work for a month, apply what is considered to be the appropriate farriery and then evaluate healing/new hoof wall growth at the coronet at the next reset. A quarter crack is always associated with a hoof capsule distortion termed a sheared heel where one heel bulb is displaced proximally relative to the contralateral side. A foot with a sheared heel will have an asymmetric landing pattern with the displaced side of the foot receiving excessive load on impact. When the increased force exerted on the ground surface of the foot at the heel exceeds the ability of the proximal hoof wall to sustain the excessive load, a full thickness defect will development at the coronet. For additional information on sheared heels, the reader is referred HERE. A 16-year-old warmblood gelding used as a show hunter was referred due to a persistent quarter crack located on the lateral side of the RF foot. History was that the horse had been shod in various ways, the cracked persisted and when he tried to compete; the crack would bleed. When presented, there was a full thickness quarter crack present in the lateral hoof wall with marked displacement of the coronet above the origin of the defect. The hoof wall was movable when digital pressure was place on either side of the defect at the coronet. There was a sheared heel on the lateral side of the foot with the hoof wall starting to run under (Figure 1). The horse was shod with a Z bar shoe which in the author’s opinion may have been somewhat small. In motion the horse was sound but showed an asymmetric landing pattern with the lateral side of the foot contacting the ground prior to the medial side. I don’t use Z bar shoes as I feel there are better options to protect and unload the affected quarter/heel bulb and to redistribute weight bearing to other areas of the foot. For additional thoughts regarding the Z bar shoe, the reader is referred HERE. 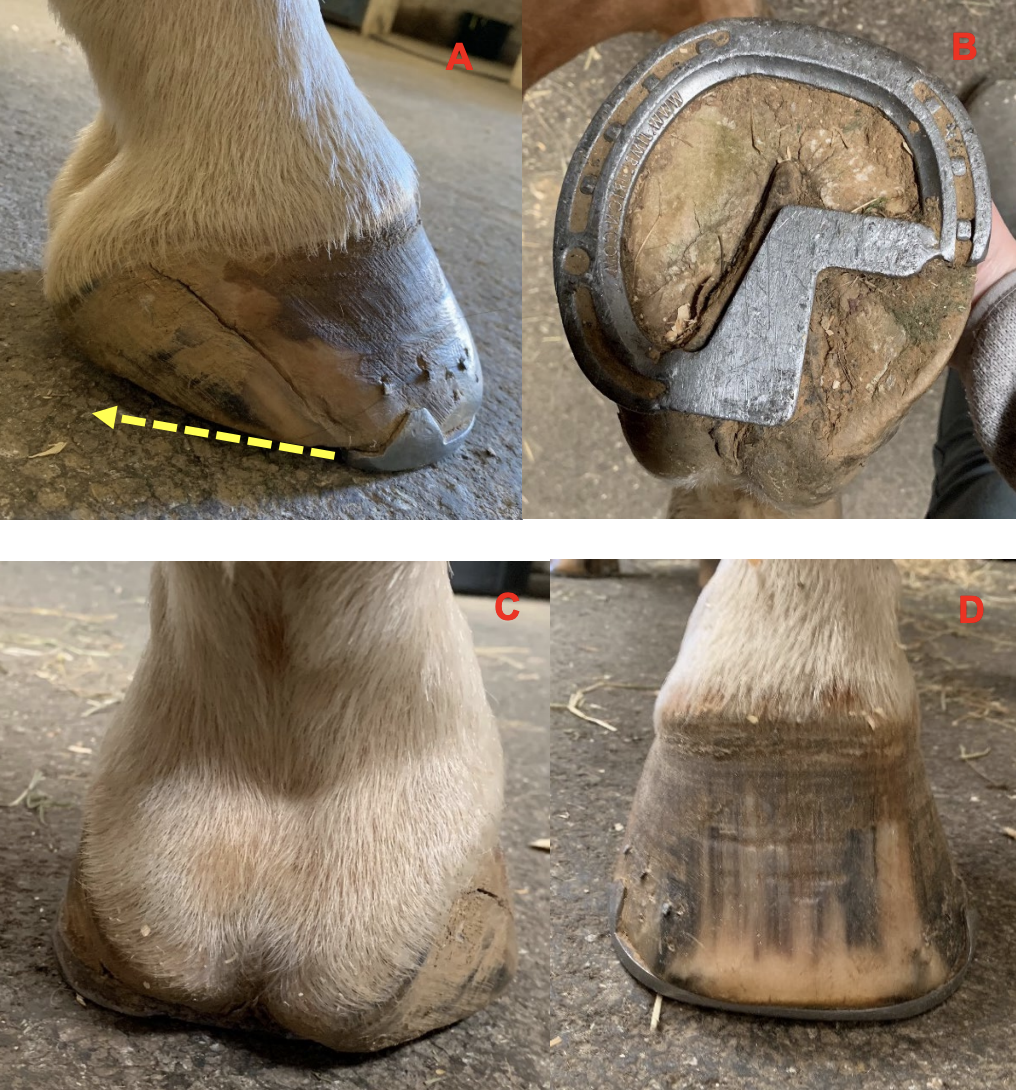 Figure 1. A…yellow arrow shows fulcrum created in Z bar shoe that causes the crack to descend toward the ground and open during weight bearing. B…shows ground surface under the crack that is unprotected with the Z bar shoe. C…sheared heel that is underrunning. D…coronet shows packed growth rings which is a sign of stress and a flare in medial hoof wall. It was agreed to take this horse out of work although light hacking and turnout was permitted. The horse was shod using what I call the double trim method. The shoe was removed, a line was drawn across the widest part of the foot and the heels of the hoof capsule were trimmed from the line palmarly to where the heels were on the same plane as the frog. The toe length was reduced to where there was approximate surface area on either side of the line. A # 3 straight bar shoe was fitted to the foot, breakover was created in the shoe and a leather pad was attached to the shoe to hold the impression material. A second trim was performed where the hoof wall was reduced in a tapered fashion from the toe quarter to the heel which creates a space between the hoof and the shoe. Impression material was placed in the dorsal sole and medial frog sulci to further redistribute the weight away from the latera heel bulb and the shoe was applied (Figure 2). The LF foot was shod in a similar manner with a straight bar shoe and a leather pad. 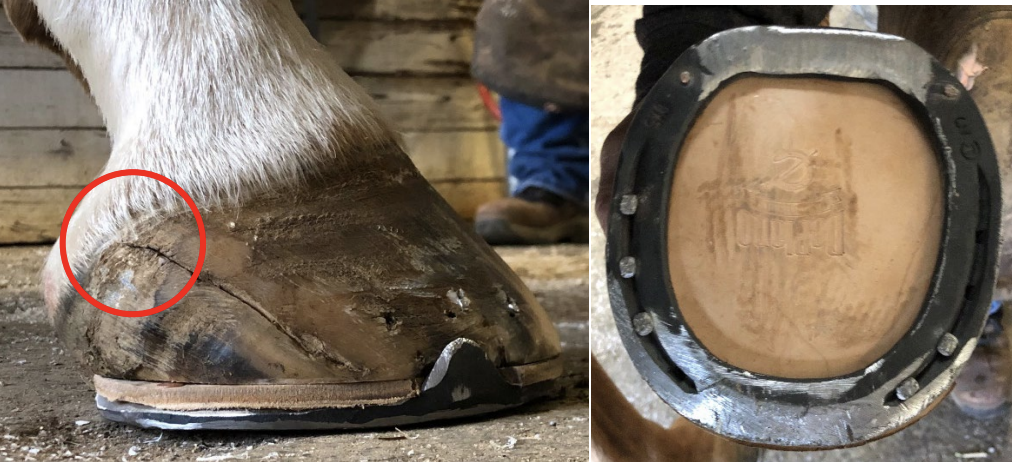 Figure 2. Lateral and solar view of the foot. Red arrow in lateral view shows a crusty consistency of the coronet at the origin of the crack which is a sign of compromised circulation due to stress. The horse was reevaluated five weeks later and significant hoof wall growth with good consistency was noted above the origin of the crack. However, the growth was not as solid as expected and there was still more displacement of the coronet above the defect than desired. (Figure 3A). I suggested to the client, that we use an additional two weeks but pull the shoes off for that period of time. I felt this would share the weight over the entire section of the palmar foot, allow the sheared heel to assume a more acceptable position and thus promote further healing. Faced with the COVID-19 problems and the non-existence of equine competitions in the foreseeable future; they readily agreed. The front shows were removed, the foot was trimmed from the widest part of the foot until the heels were level with the frog or on the same plane as the frog. No horn was removed from the bottom of the foot and the wall around the perimeter of the foot was trimmed at a 45° angle starting on the outer side of the sole wall junction (white line). The sharp edge that is formed from using the rasp at an angle is removed; leaving a strong rounded hoof wall that is less prone to crack or chip. For more thoughts on barefoot methodology, the reader is referred HERE. When the horse was evaluated two weeks later, there was increased hoof wall growth at the coronet, the growth was solid and smooth and the displacement above the defect had settled into a better position (Figure 3B). Although a picture is not available, the tissue between the coronet and the middle phalanx had relaxed and become wider. 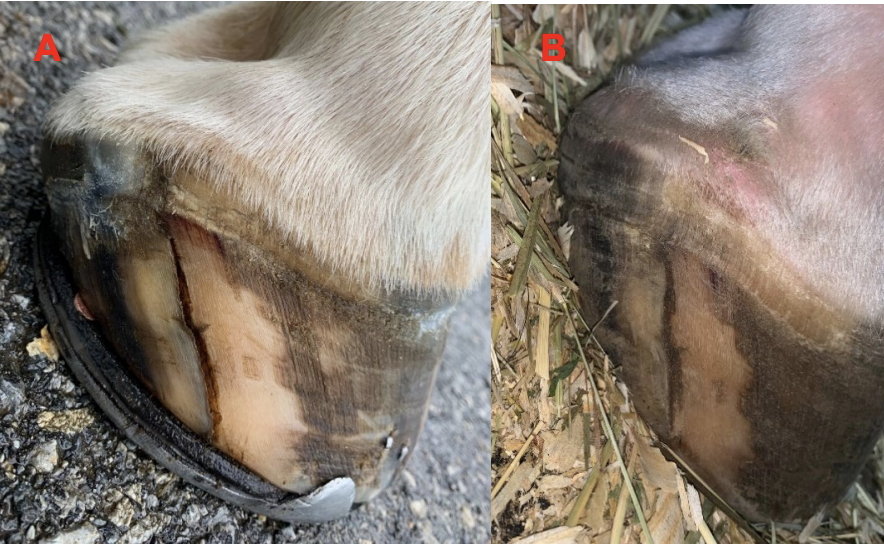 Figure 3A & 3B. A…coronet at 5 weeks shows adequate but not solid growth and still marked displacement at of coronet above defect. B…after 2 weeks barefoot, there is 1.5 cm of solid hoof wall growth and improvement in the displacement of the coronet. The horse was reshod using the double trim method as described in the initial farriery. A line was drawn across the widest part of the foot, the heels were trimmed to the same plane as the frog and any toe length necessary or hoof wall flares were reduced using a rasp from the dorsal hoof wall. A # 3 steel straight bar shoe was fitted to the foot. The second trim reduced the hoof wall on the solar surface of the foot from the toe quarter to the heel in a tapered manner. The space created allows the sheared heel to continually settle down to the shoe. The shoe was attached using just one or two nails in the toe on the lateral side so as not to lock the heel in place (Figure 4). The horse was allowed to go back to work on the flat with no jumping until after the next reset. 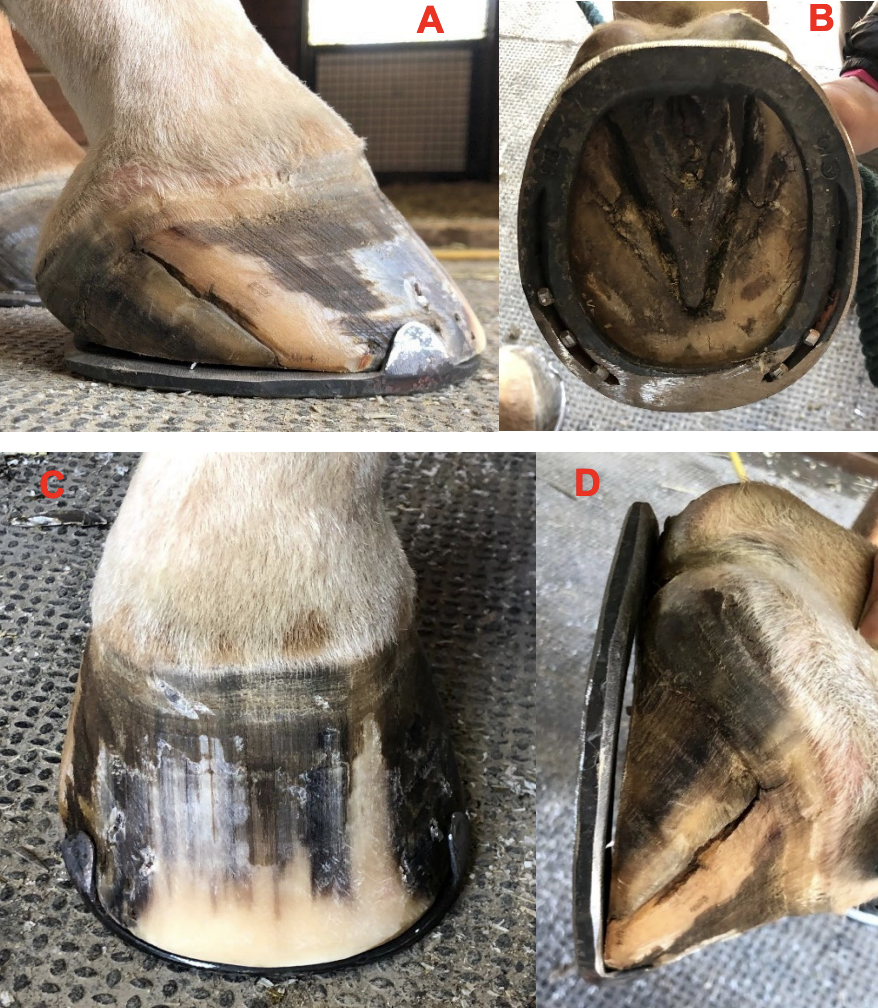 Figure 4. A…the lateral view of the foot. B…is the solar surface of the foot. C…front view shows the smooth coronet which is a sign of decreased stress. D…shows the tapered space created between the foot and the shoe at the second trim which allows the heel to descend Conclusion There are many competition horses that develop a quarter crack but need to continue to compete…they may be shod differently and the crack is repaired or the defect is repaired without the appropriate therapeutic farriery…I get that! I have certainly published a few papers on how I do a repair when necessary. It has to be remembered that there is a cause that led to the formation of a crack and that not only is there a defect in the hoof wall but there is soft tissue damage in the laminar interface beneath the wall… all of this needs time to heal. Therefore, when possible, I prefer to do the farriery and monitor the horse through the first shoeing cycle to see if the defect begins to heal. This time frame also allows for some degree of healing. If healing is evident, I assume the farriery is appropriate; I can then repair the defect if necessary or leave it grow out. I would like to thank the referring veterinarian Dr. Sallie Hyman and compliment the farrier Matt Gonzales, who worked on this case with me, for his cooperation, insight and skilled farriery |